> ## Documentation Index
> Fetch the complete documentation index at: https://docs.qcall.ai/llms.txt
> Use this file to discover all available pages before exploring further.
# Plivo SIP Integration
> This page describes everything about Plivo SIP Integration
## Plivo SIP Integration Guide — QCall SIP Dialer (Inbound + Outbound)
This guide walks a customer through connecting a **Plivo SIP trunk** to QCall so their
AI agent can place **outbound** calls and receive **inbound** calls on a real phone number.
It has two halves:
* **Part A — Plivo side:** buy a number, create an Outbound Trunk, generate SIP credentials, and get the
values QCall needs.
* **Part B — QCall side:** add the SIP Dialer in the QCall dashboard, then finish the inbound
loop-back on Plivo.
> **You need one thing from each side.** Plivo gives you a *SIP termination domain + username + password +
> phone number*. QCall gives you back a *SIP URI* that Plivo must forward inbound calls to. That
> two-way handshake is the whole integration.
***
## How it works (architecture)
```
┌─────────────────────────────────────────────┐
│ QCall │
│ (SIP trunks + AI agent backend) │
└─────────────────────────────────────────────┘
OUTBOUND ─────────────────────────────►
AI agent dials a lead: Outbound Trunk
QCall → Plivo termination URI ─────────────► sends INVITE to
authenticated with username/password {trunk_id}.zt.plivo.com ──► PSTN ──► Lead's phone
INBOUND ◄─────────────────────────────
Caller dials your Plivo DID number ──► Plivo ──► routes (Primary URI) to
your QCall SIP URI ────────────────► Inbound Trunk (matches the number)
──► Dispatch Rule ──► AI agent answers
```
* **Outbound = QCall → Plivo.** From QCall's point of view, Plivo is where the call *terminates*
into the phone network. That is why QCall calls it the **SIP Termination URI**.
* **Inbound = Plivo → QCall.** Plivo must be told to *originate* the incoming call toward QCall's
SIP address (set as the Plivo **Inbound Trunk Primary URI**).
***
## Credential cheat-sheet (Plivo → QCall field mapping)
Fill this in as you go through Part A. You'll paste the right-hand column into the QCall dashboard
in Part B.
| What you get from Plivo | Example value | QCall dashboard field |
| ----------------------------------------- | ----------------------------- | ----------------------- |
| Outbound Trunk **termination SIP domain** | `21784177241578.zt.plivo.com` | **SIP Termination URI** |
| Outbound Trunk **credential username** | `qcallprod` | **SIP Username** |
| Outbound Trunk **credential password** | `••••••••••••` (shown once) | **SIP Password** |
| Purchased **DID / phone number** | `+12025550147` | **Phone Number** |
| *(any label you like)* | `My Plivo Line` | **Dialer Name** |
Then, after saving in QCall, you receive **one** value to bring *back* to Plivo:
| What QCall gives you | Example value | Where it goes in Plivo |
| -------------------- | ------------------------------- | ----------------------------- |
| Your **SIP URI** | `myproj-x1y2.sip.livekit.cloud` | Inbound Trunk **Primary URI** |
> The exact SIP URI is shown on your dialer's **SIP configuration** in the QCall dashboard
> (it is workspace-specific). Use that value — do not copy the example above.
***
# Part A — Plivo: get your SIP credentials & number
## Step 1 — Create your Plivo account
1. Sign up at **[https://cx.plivo.com](https://cx.plivo.com)** (new accounts get free trial credit).
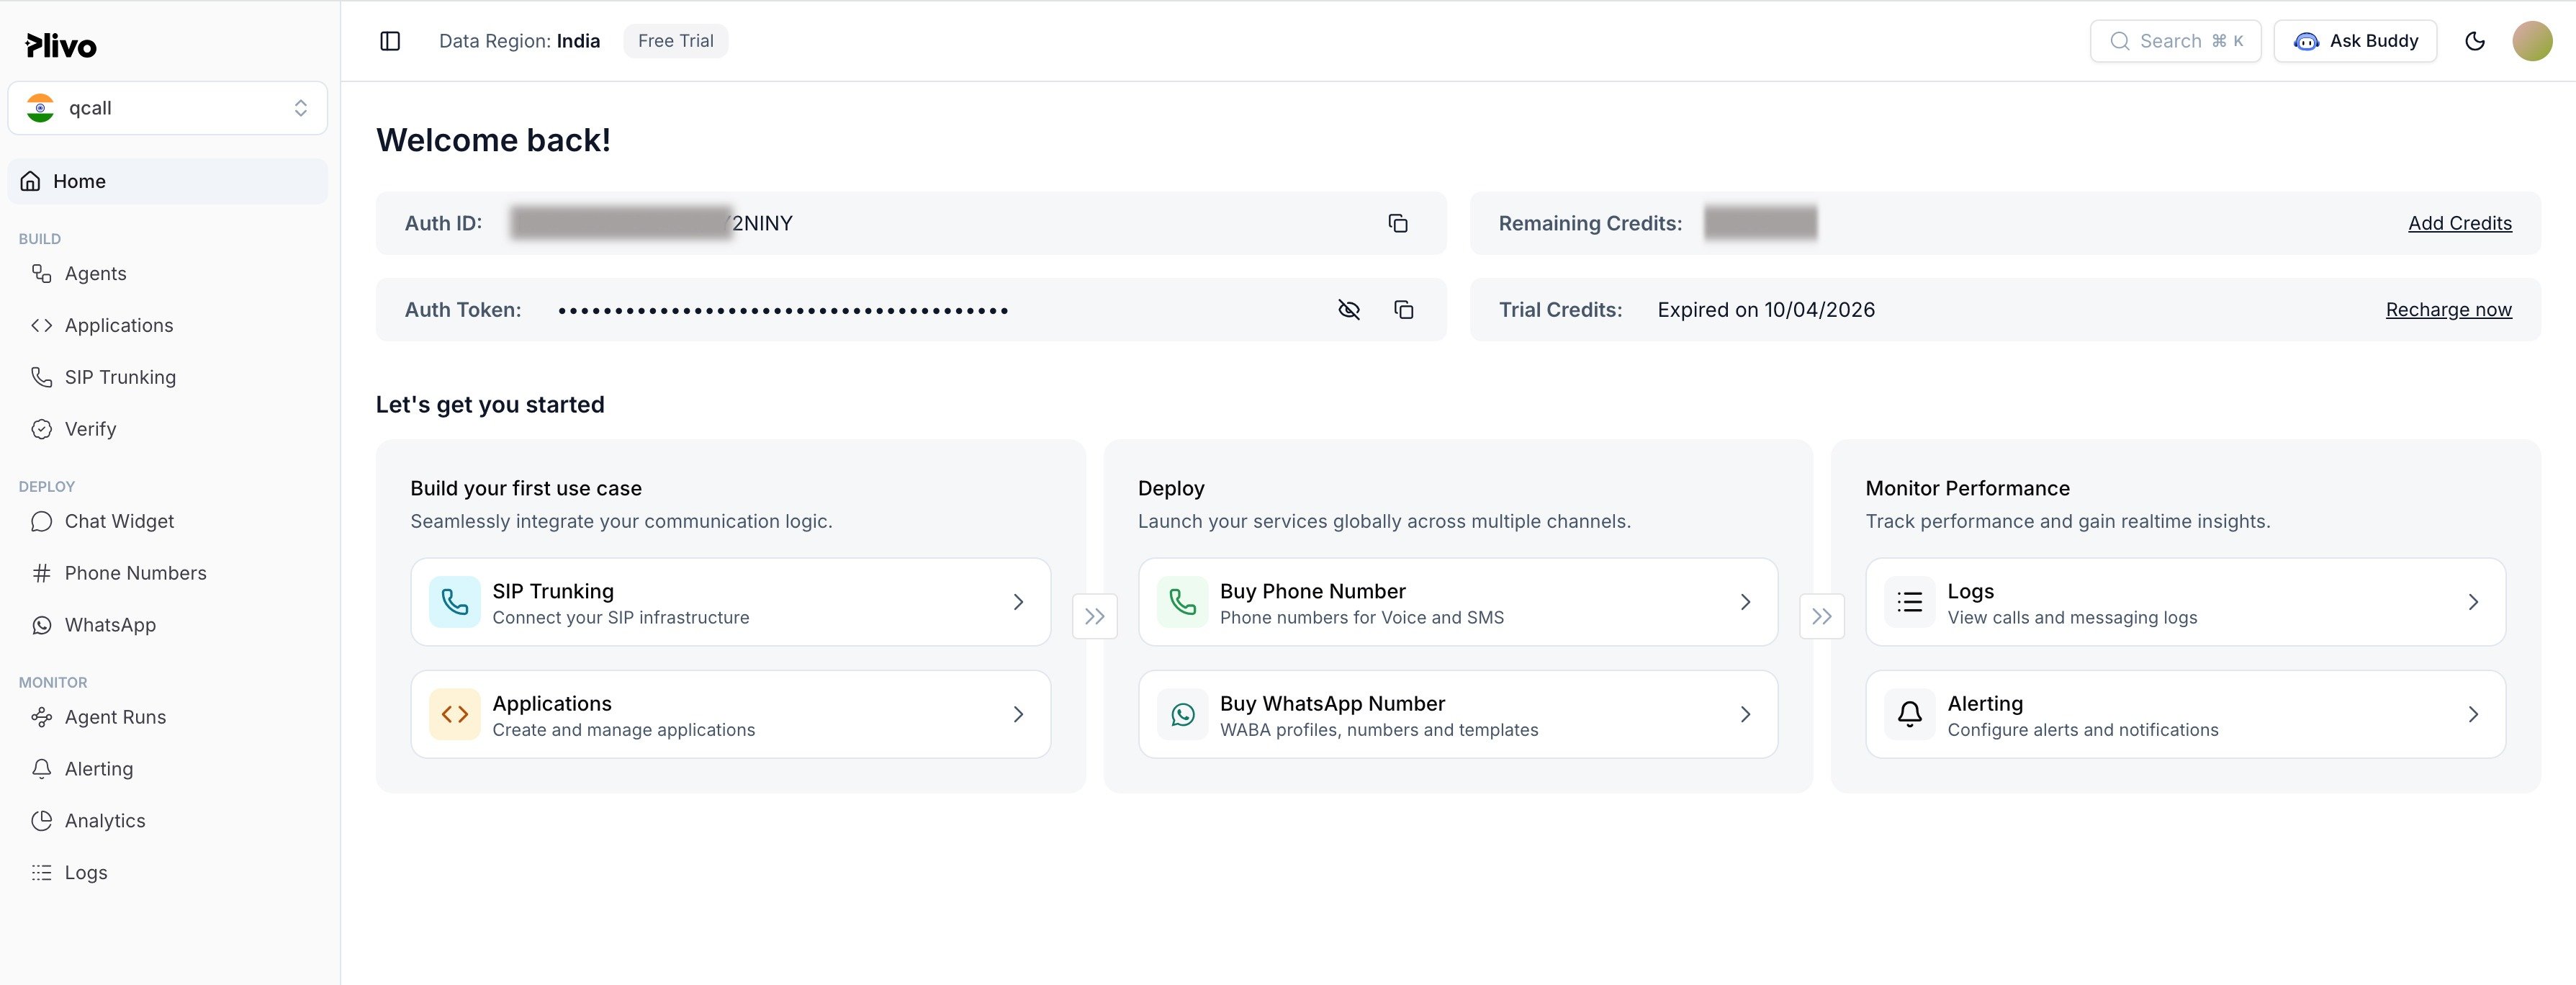
2. After login, open the dashboard. Plivo's SIP trunking product is called **Zentrunk** — you'll find
it under **SIP Trunking** in the sidebar. Note your account-level **Auth ID** and **Auth Token**
(these authenticate Plivo API calls; you do **not** paste them into QCall).
 ## Step 2 — Buy a phone number (DID)
1. In the Plivo console, go to **Phone Numbers → Buy New Number**.
2. Filter by **Country**, **Prefix**, **Type**, and set **Capability** to **Voice** (inbound + outbound).
3. Search, pick a number, and click **Buy Number**. This number is your caller ID for outbound and your
ring-in number for inbound.
4. Record it in **E.164 format with the `+` and country code** — e.g. `+12025550147`.
→ This becomes the **Phone Number** field in QCall.
## Step 2 — Buy a phone number (DID)
1. In the Plivo console, go to **Phone Numbers → Buy New Number**.
2. Filter by **Country**, **Prefix**, **Type**, and set **Capability** to **Voice** (inbound + outbound).
3. Search, pick a number, and click **Buy Number**. This number is your caller ID for outbound and your
ring-in number for inbound.
4. Record it in **E.164 format with the `+` and country code** — e.g. `+12025550147`.
→ This becomes the **Phone Number** field in QCall.
 ## Step 3 — Create an Outbound Trunk
The Outbound Trunk is what QCall sends outbound calls **into** — it is the source of your
**SIP Termination URI**.
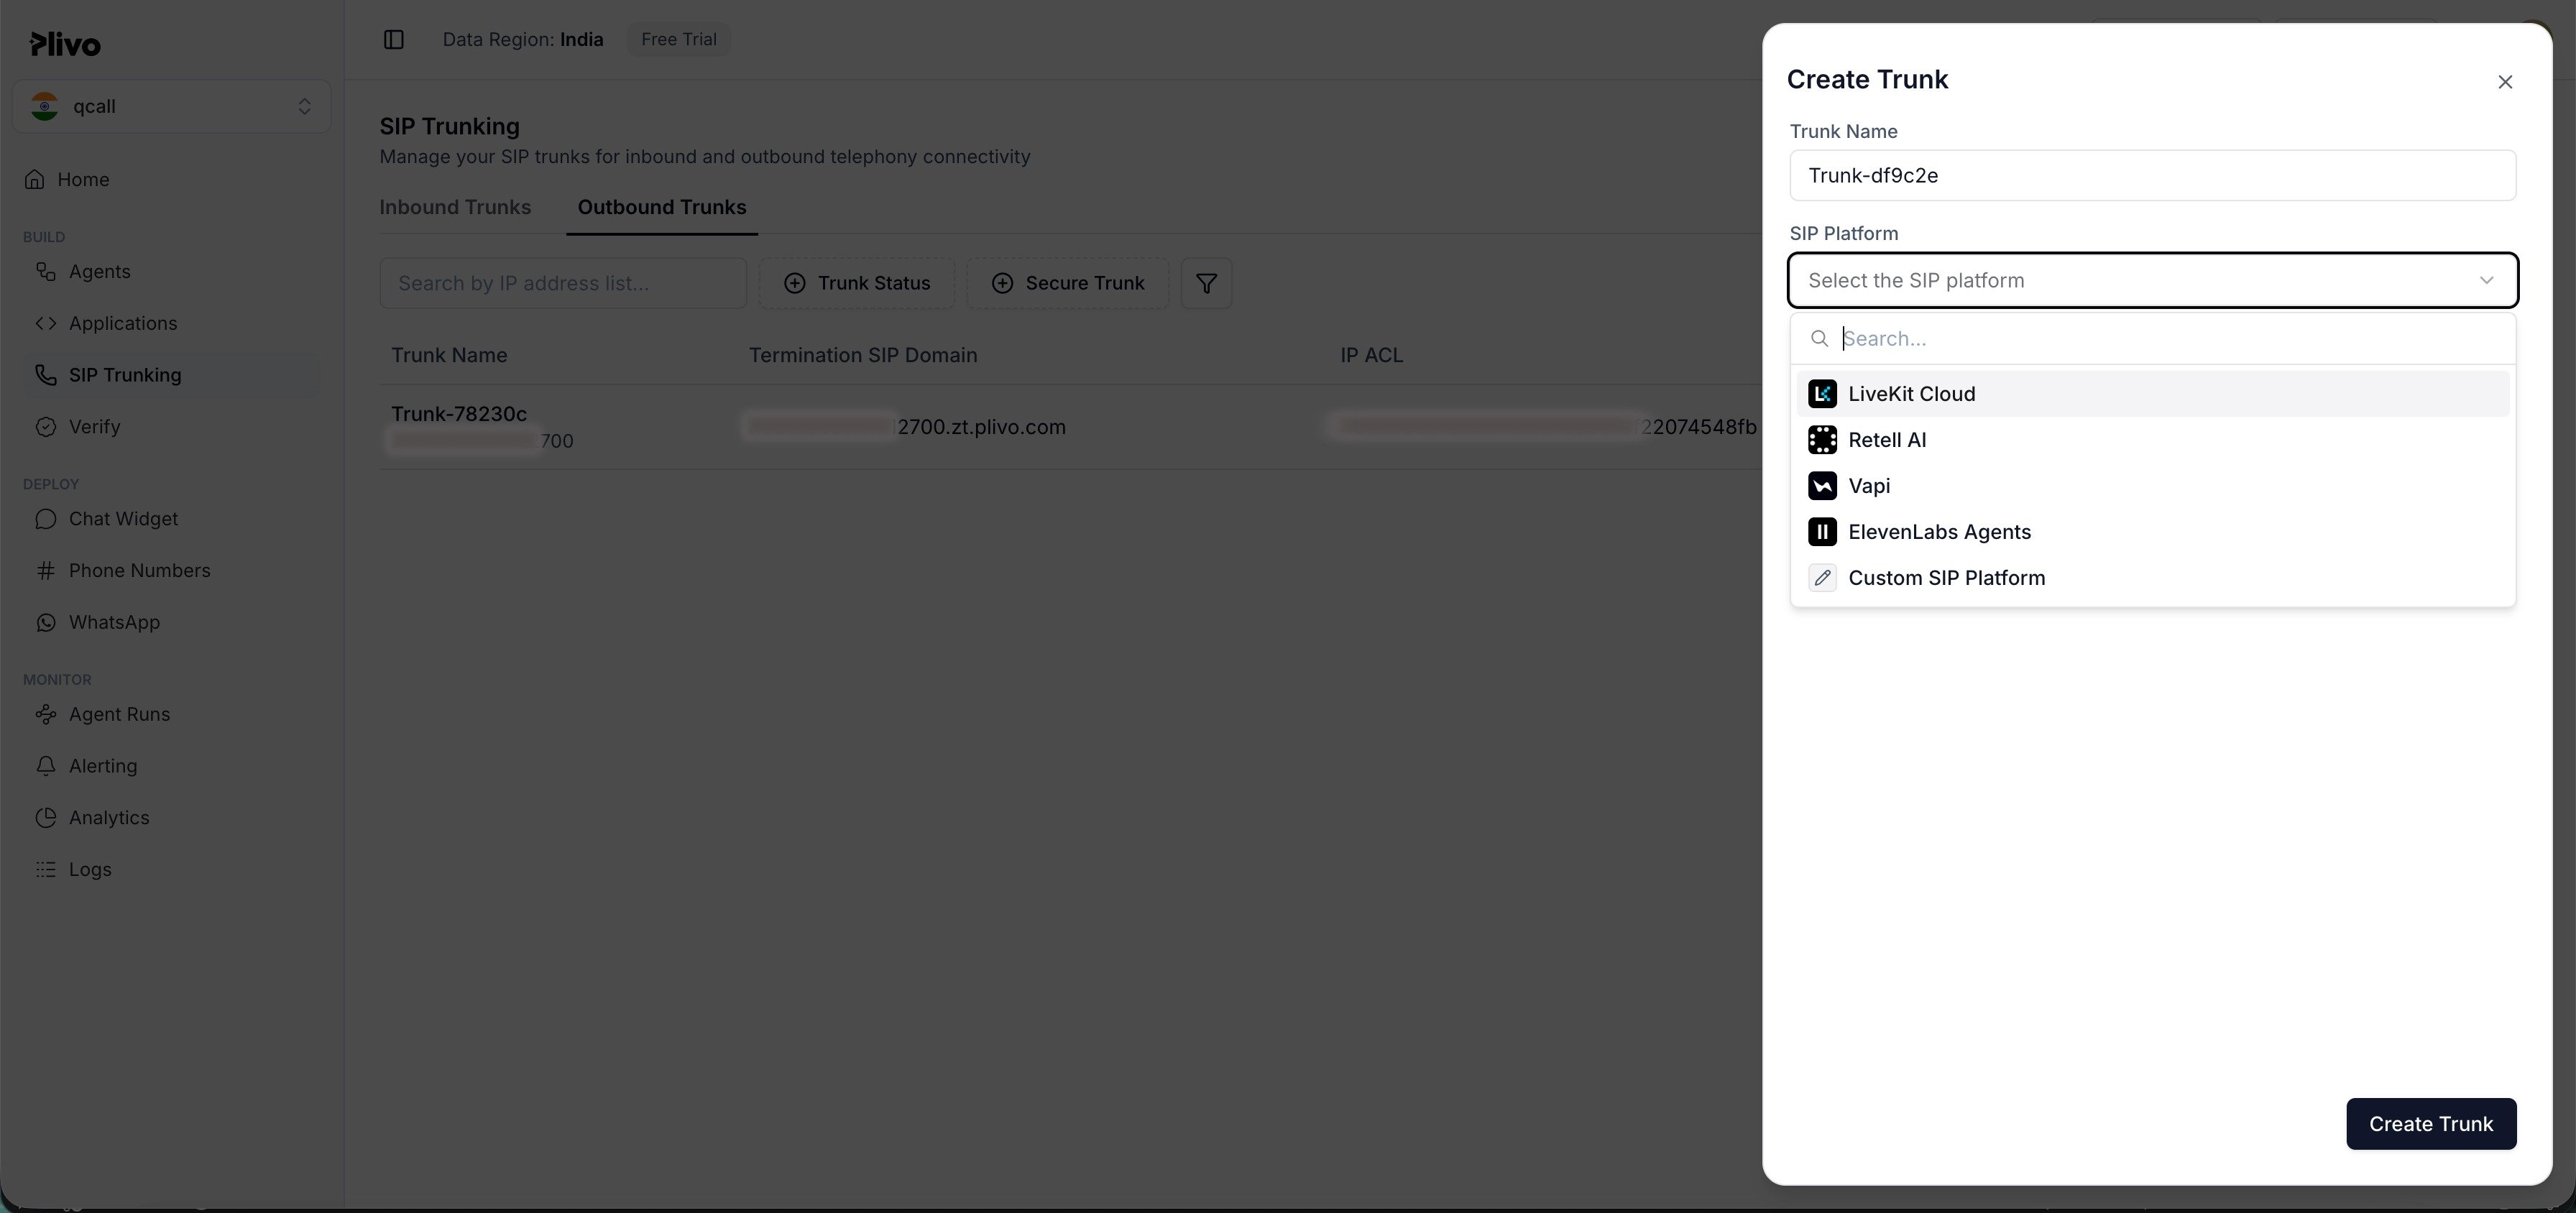
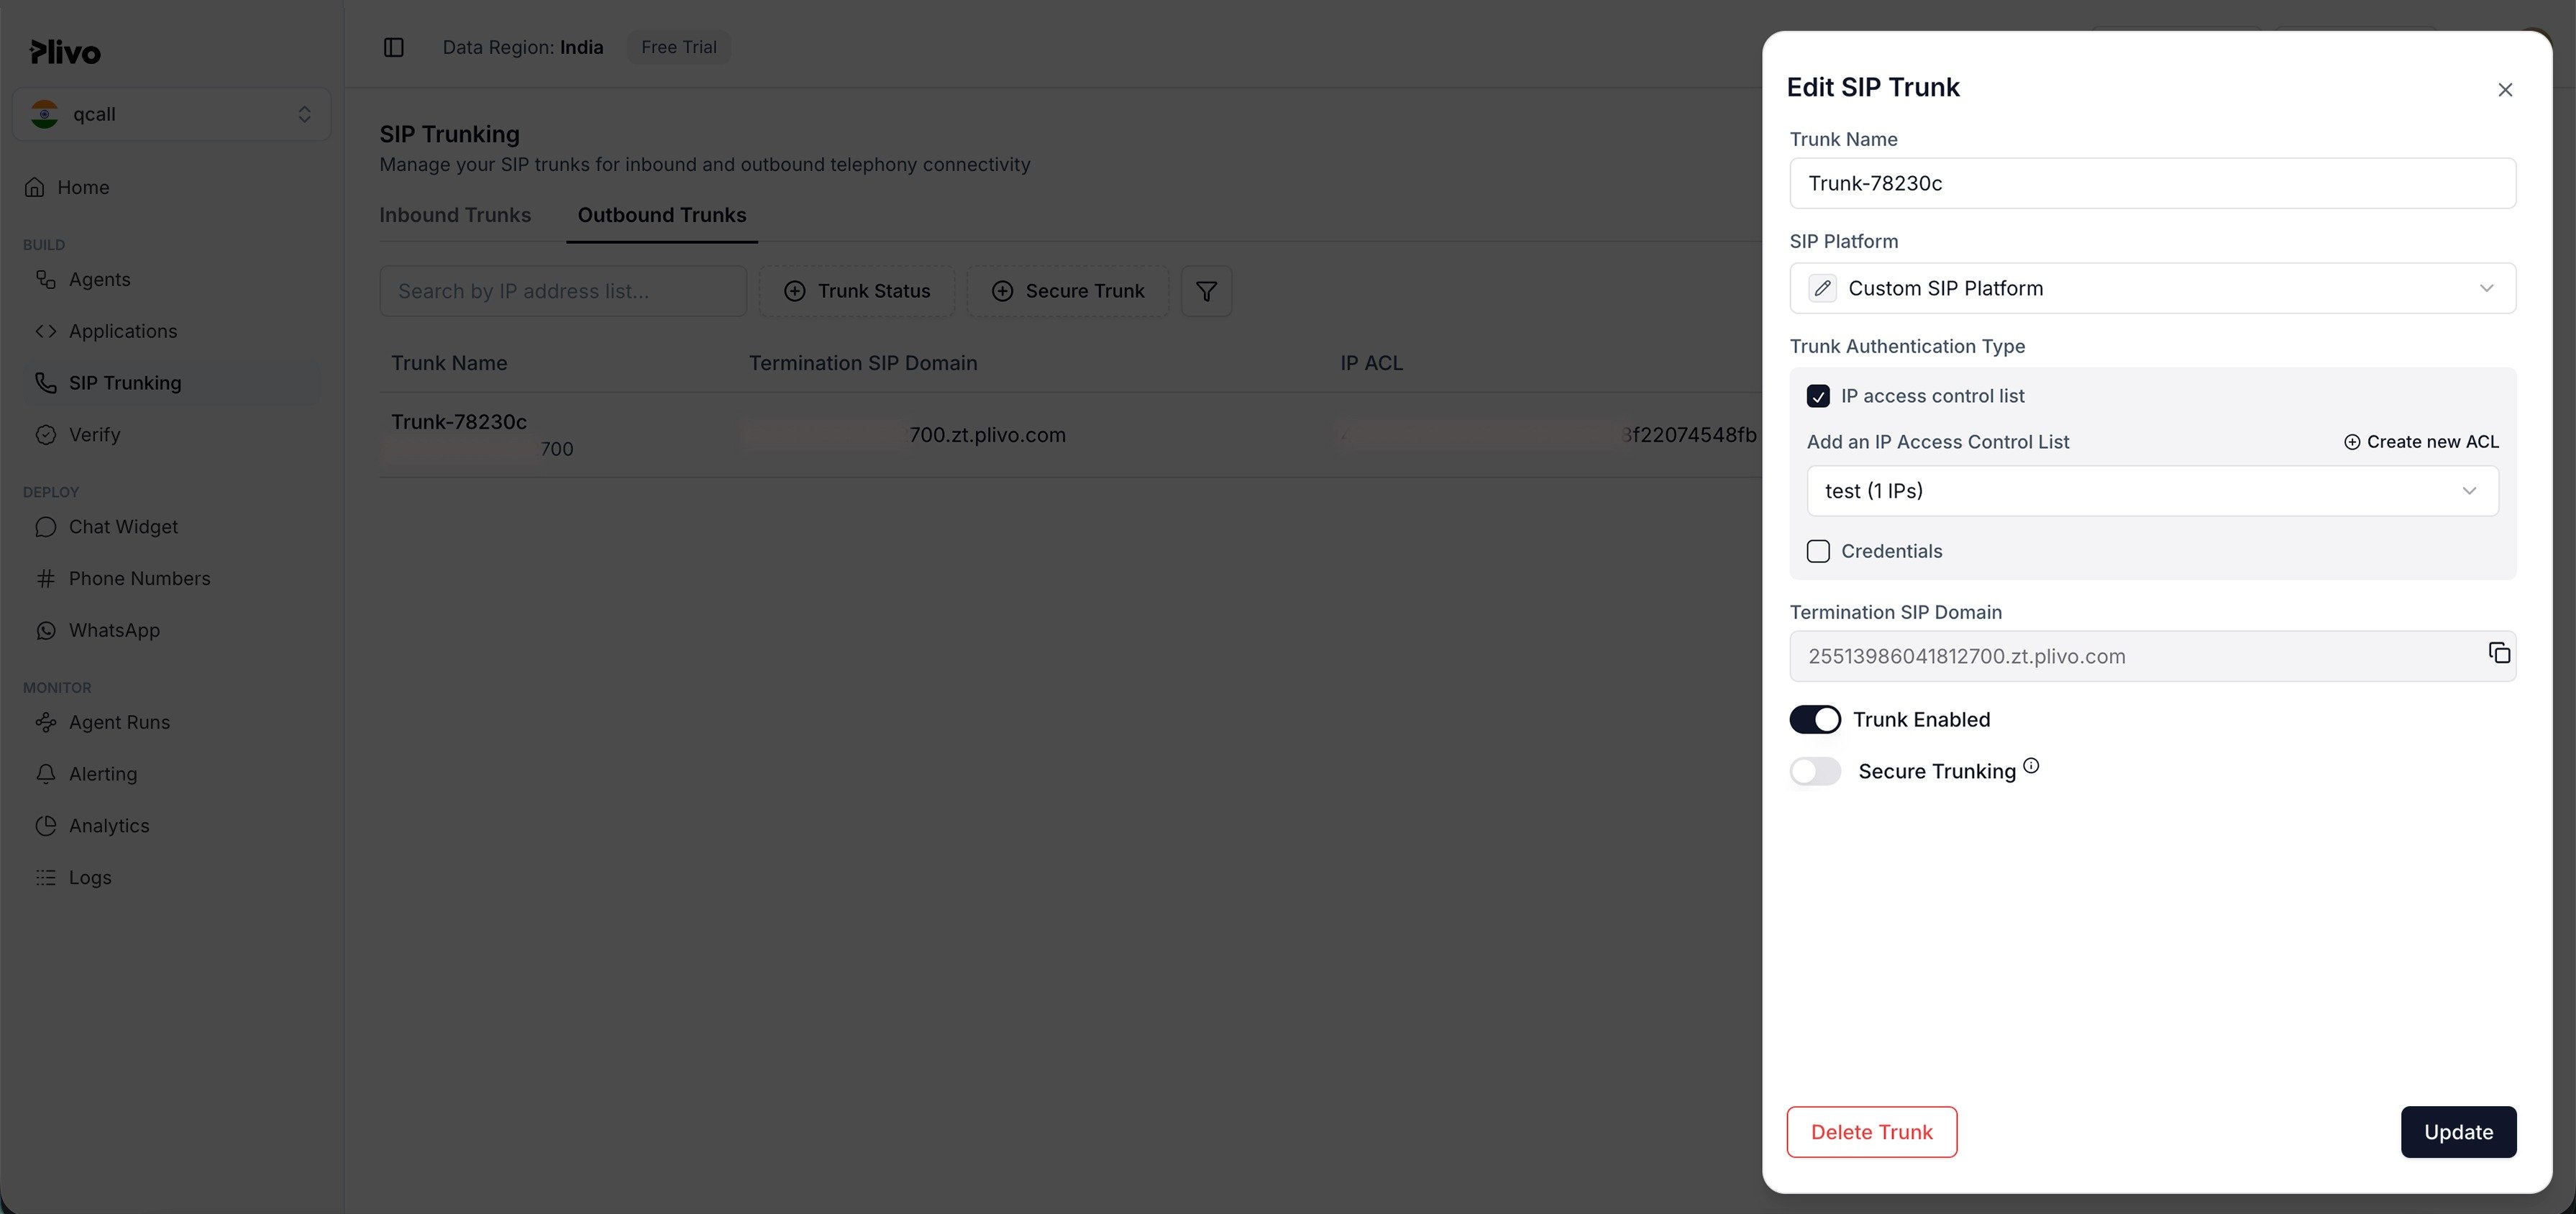
1. Go to **SIP Trunking → Outbound Trunks** and click **Create New Outbound Trunk**.
2. Under **Trunk Details**, enter a name (e.g. `qcall-outbound`).
3. For **Trunk Authentication**, choose **Credentials List** (QCall authenticates with
username/password, not IP). Create the credentials in Step 4.
4. (Optional) Leave **Secure Trunking** off to start — you can enable TLS/SRTP later.
5. On save, Plivo provisions a unique **termination SIP domain** in the form
`{trunk_id}.zt.plivo.com` (e.g. `21784177241578.zt.plivo.com`).
→ This becomes the **SIP Termination URI** in QCall.
## Step 3 — Create an Outbound Trunk
The Outbound Trunk is what QCall sends outbound calls **into** — it is the source of your
**SIP Termination URI**.
1. Go to **SIP Trunking → Outbound Trunks** and click **Create New Outbound Trunk**.
2. Under **Trunk Details**, enter a name (e.g. `qcall-outbound`).
3. For **Trunk Authentication**, choose **Credentials List** (QCall authenticates with
username/password, not IP). Create the credentials in Step 4.
4. (Optional) Leave **Secure Trunking** off to start — you can enable TLS/SRTP later.
5. On save, Plivo provisions a unique **termination SIP domain** in the form
`{trunk_id}.zt.plivo.com` (e.g. `21784177241578.zt.plivo.com`).
→ This becomes the **SIP Termination URI** in QCall.
 ## Step 4 — Create SIP credentials (username + password)
1. From the Outbound Trunk → **Trunk Authentication → Credentials List → + Add New Credentials List**.
2. Enter an **Auth Group** name (e.g. `qcall-creds`), a **username**, and a **password**.
* Username: **5–20 alphanumeric** characters (e.g. `qcallprod`).
* Password: **5–20** characters, alphanumeric plus `~!@#$%^&*()_+`, **including at least one special
character**.
3. **Copy the password now** and store it securely — Plivo stores it hashed and you'll re-enter it in
QCall. If you lose it, create a new credential.
4. Back on the Outbound Trunk, select this credential group in the **Authentication** dropdown and save.
→ Username + password become **SIP Username** and **SIP Password** in QCall.
## Step 4 — Create SIP credentials (username + password)
1. From the Outbound Trunk → **Trunk Authentication → Credentials List → + Add New Credentials List**.
2. Enter an **Auth Group** name (e.g. `qcall-creds`), a **username**, and a **password**.
* Username: **5–20 alphanumeric** characters (e.g. `qcallprod`).
* Password: **5–20** characters, alphanumeric plus `~!@#$%^&*()_+`, **including at least one special
character**.
3. **Copy the password now** and store it securely — Plivo stores it hashed and you'll re-enter it in
QCall. If you lose it, create a new credential.
4. Back on the Outbound Trunk, select this credential group in the **Authentication** dropdown and save.
→ Username + password become **SIP Username** and **SIP Password** in QCall.
 > QCall authenticates with **username/password (digest auth)**, so the Credentials List is required.
> You do **not** need to set up an IP Access Control List or know LiveKit's egress IPs.
## Step 5 — Create an Inbound Trunk & attach your DID
Numbers can only be linked to **Inbound Trunks**, so create one now and attach the number you bought
in Step 2. (You'll set its **Primary URI** later in Part C, once QCall gives you the SIP URI.)
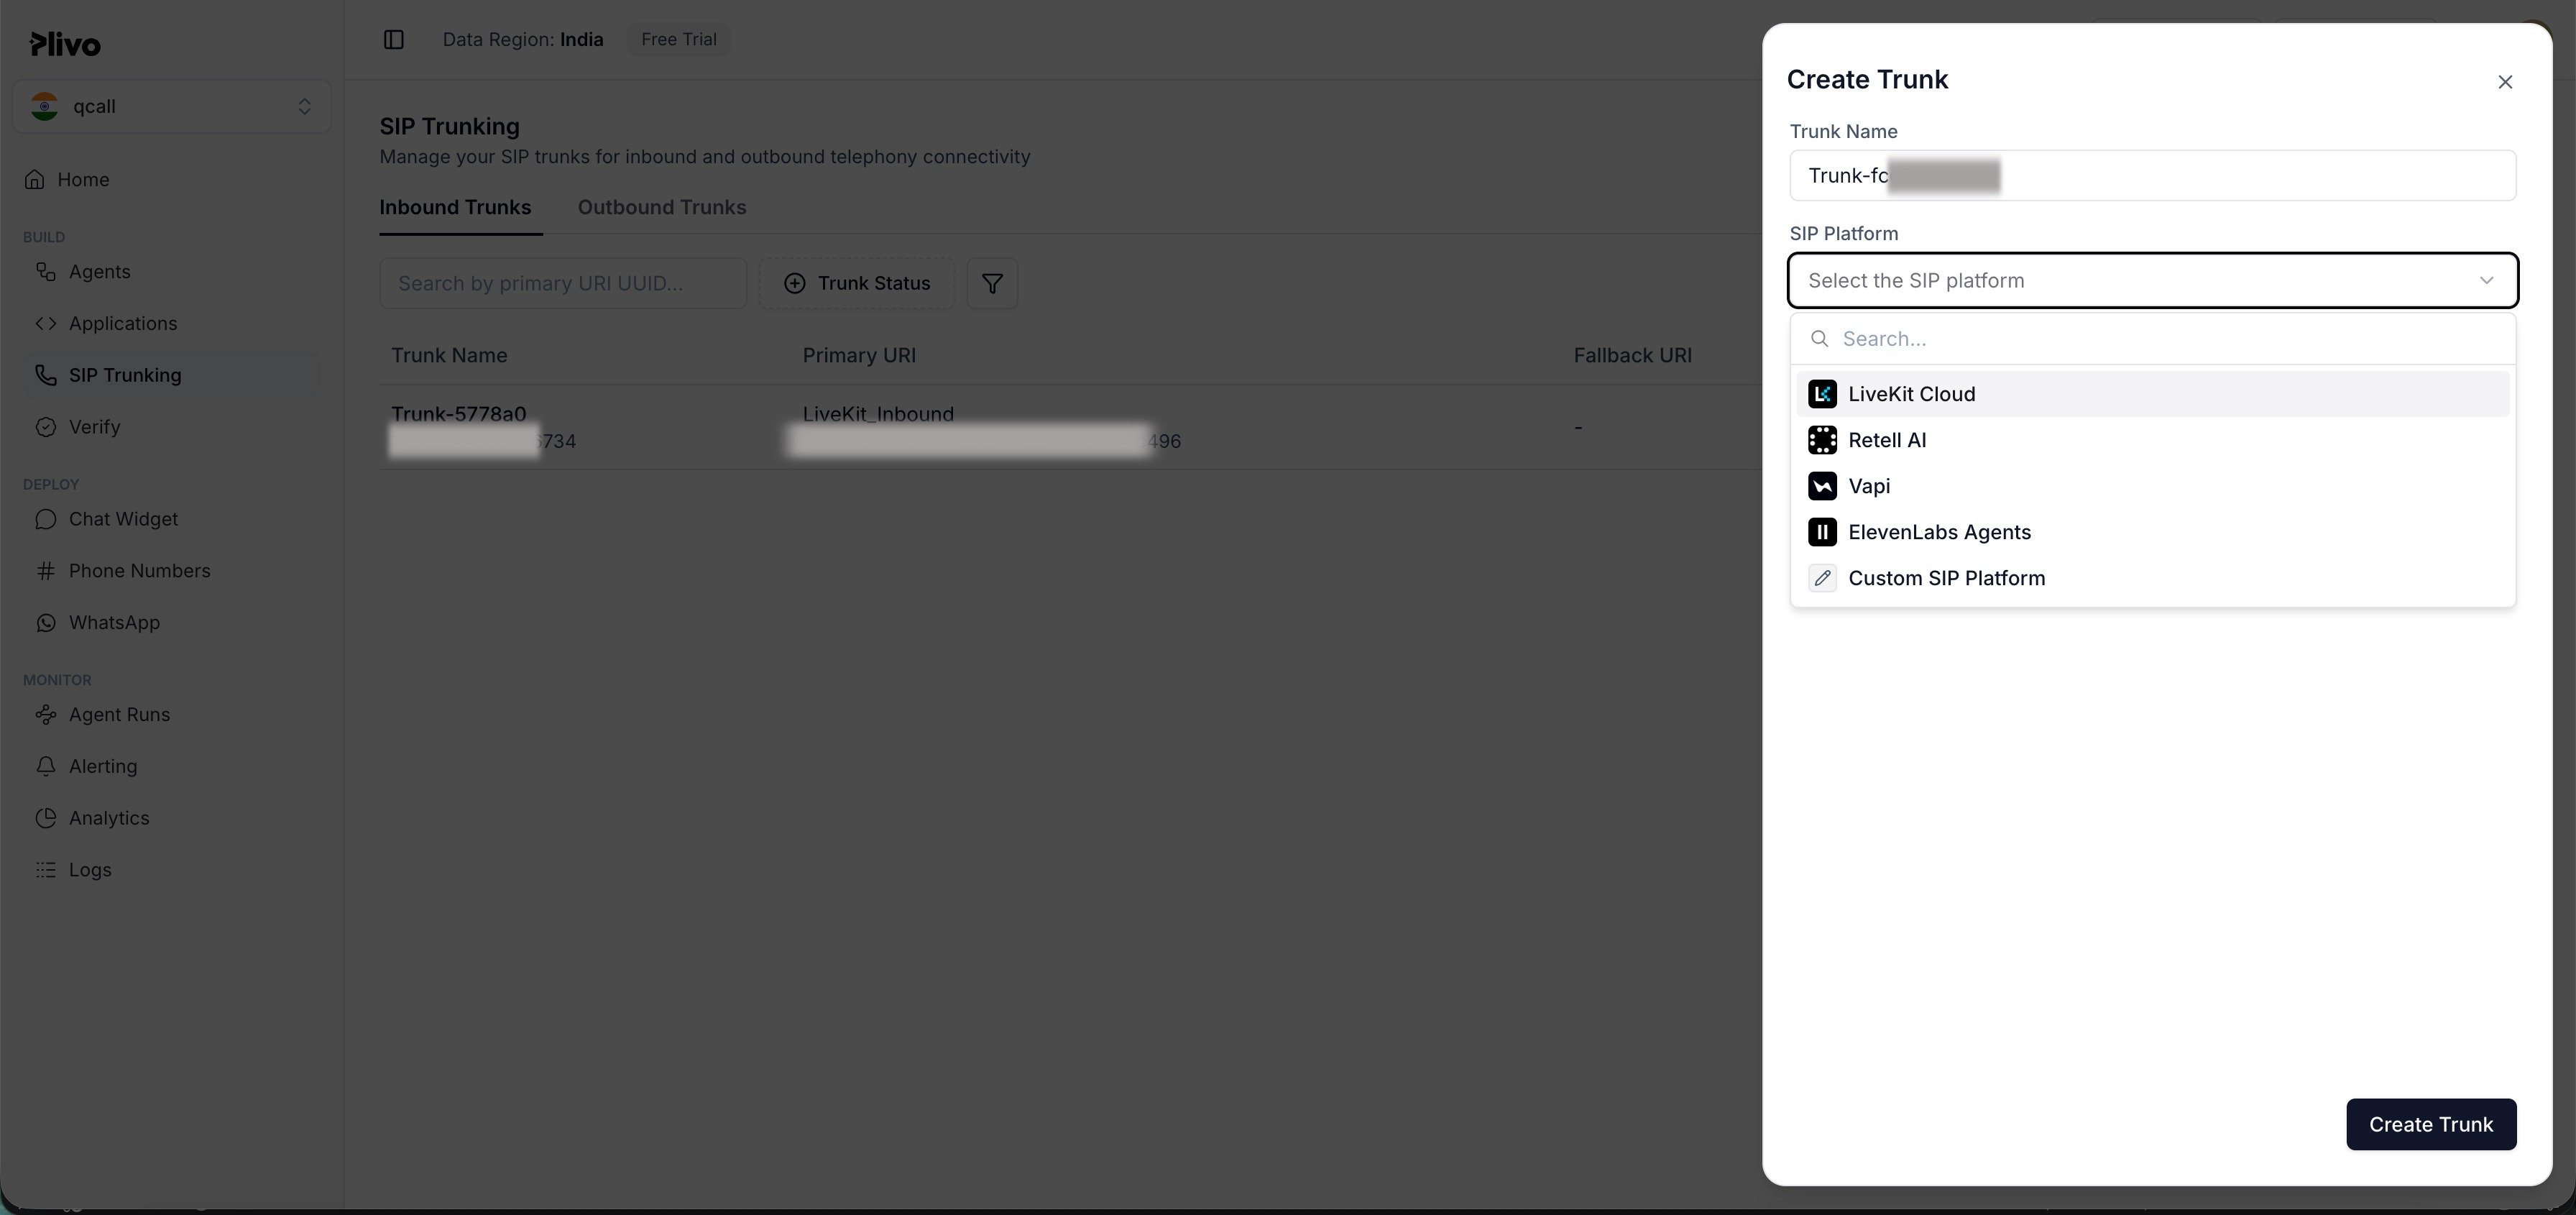
1. Go to **SIP Trunking → Inbound Trunks** and click **Create New Inbound Trunk**.
2. Enter a name (e.g. `qcall-inbound`).
3. Leave **Primary URI** empty for now — you'll fill it in **Part C**.
4. Under **Link Numbers**, select the DID from Step 2 and save.
> QCall authenticates with **username/password (digest auth)**, so the Credentials List is required.
> You do **not** need to set up an IP Access Control List or know LiveKit's egress IPs.
## Step 5 — Create an Inbound Trunk & attach your DID
Numbers can only be linked to **Inbound Trunks**, so create one now and attach the number you bought
in Step 2. (You'll set its **Primary URI** later in Part C, once QCall gives you the SIP URI.)
1. Go to **SIP Trunking → Inbound Trunks** and click **Create New Inbound Trunk**.
2. Enter a name (e.g. `qcall-inbound`).
3. Leave **Primary URI** empty for now — you'll fill it in **Part C**.
4. Under **Link Numbers**, select the DID from Step 2 and save.
 > Alternatively, from **Phone Numbers → Purchased Numbers**, open your number, set
> **Application Type** to **SIP Trunk**, choose the inbound trunk, and **Save changes**.
✅ **At this point you should have all four values** for the cheat-sheet:
termination SIP domain, username, password, and DID number.
***
# Part B — QCall dashboard: add the SIP Dialer
This is what a customer actually clicks in the QCall app.
1. Log in to the **QCall dashboard**.
2. Go to **Settings → Dialers** (the "Dialers" / "Phone Numbers" area).
3. Click **➕ Add Dialer** and choose **SIP** as the dialer type.
4. Fill in the form using your cheat-sheet:
| Field | What to enter |
| ----------------------- | ----------------------------------------------------------------- |
| **Dialer Name** | Any label, e.g. `My Plivo Line` |
| **Phone Number** | Your Plivo DID in E.164, e.g. `+12025550147` |
| **SIP Termination URI** | Your Plivo termination domain, e.g. `21784177241578.zt.plivo.com` |
| **SIP Username** | The Plivo credential username, e.g. `qcallprod` |
| **SIP Password** | The Plivo credential password (paste the one you copied) |
5. Click **Create / Save**.
**What QCall does behind the scenes** (no action needed from you):
* Creates a **outbound trunk** → sends outbound calls to your Plivo termination domain,
authenticated with your username/password, using your DID as caller ID.
* Creates a **inbound trunk** → matched to your DID number.
* Creates a **dispatch rule** → routes incoming calls on that number to your AI agent.
**What QCall gives you back:** on success, the dialer now exists and QCall exposes your
**SIP URI** (shown in the dialer's SIP config / setup instructions, format
`yourproject.sip.livekit.cloud`). **Copy it — you need it for Part C.**
> If you don't see the SIP URI in the UI, it's a fixed value for your QCall workspace — ask QCall
> support and they'll provide your SIP domain.
***
# Part C — Plivo: finish the inbound loop-back
Inbound calls only reach your AI agent once Plivo knows where to forward them.
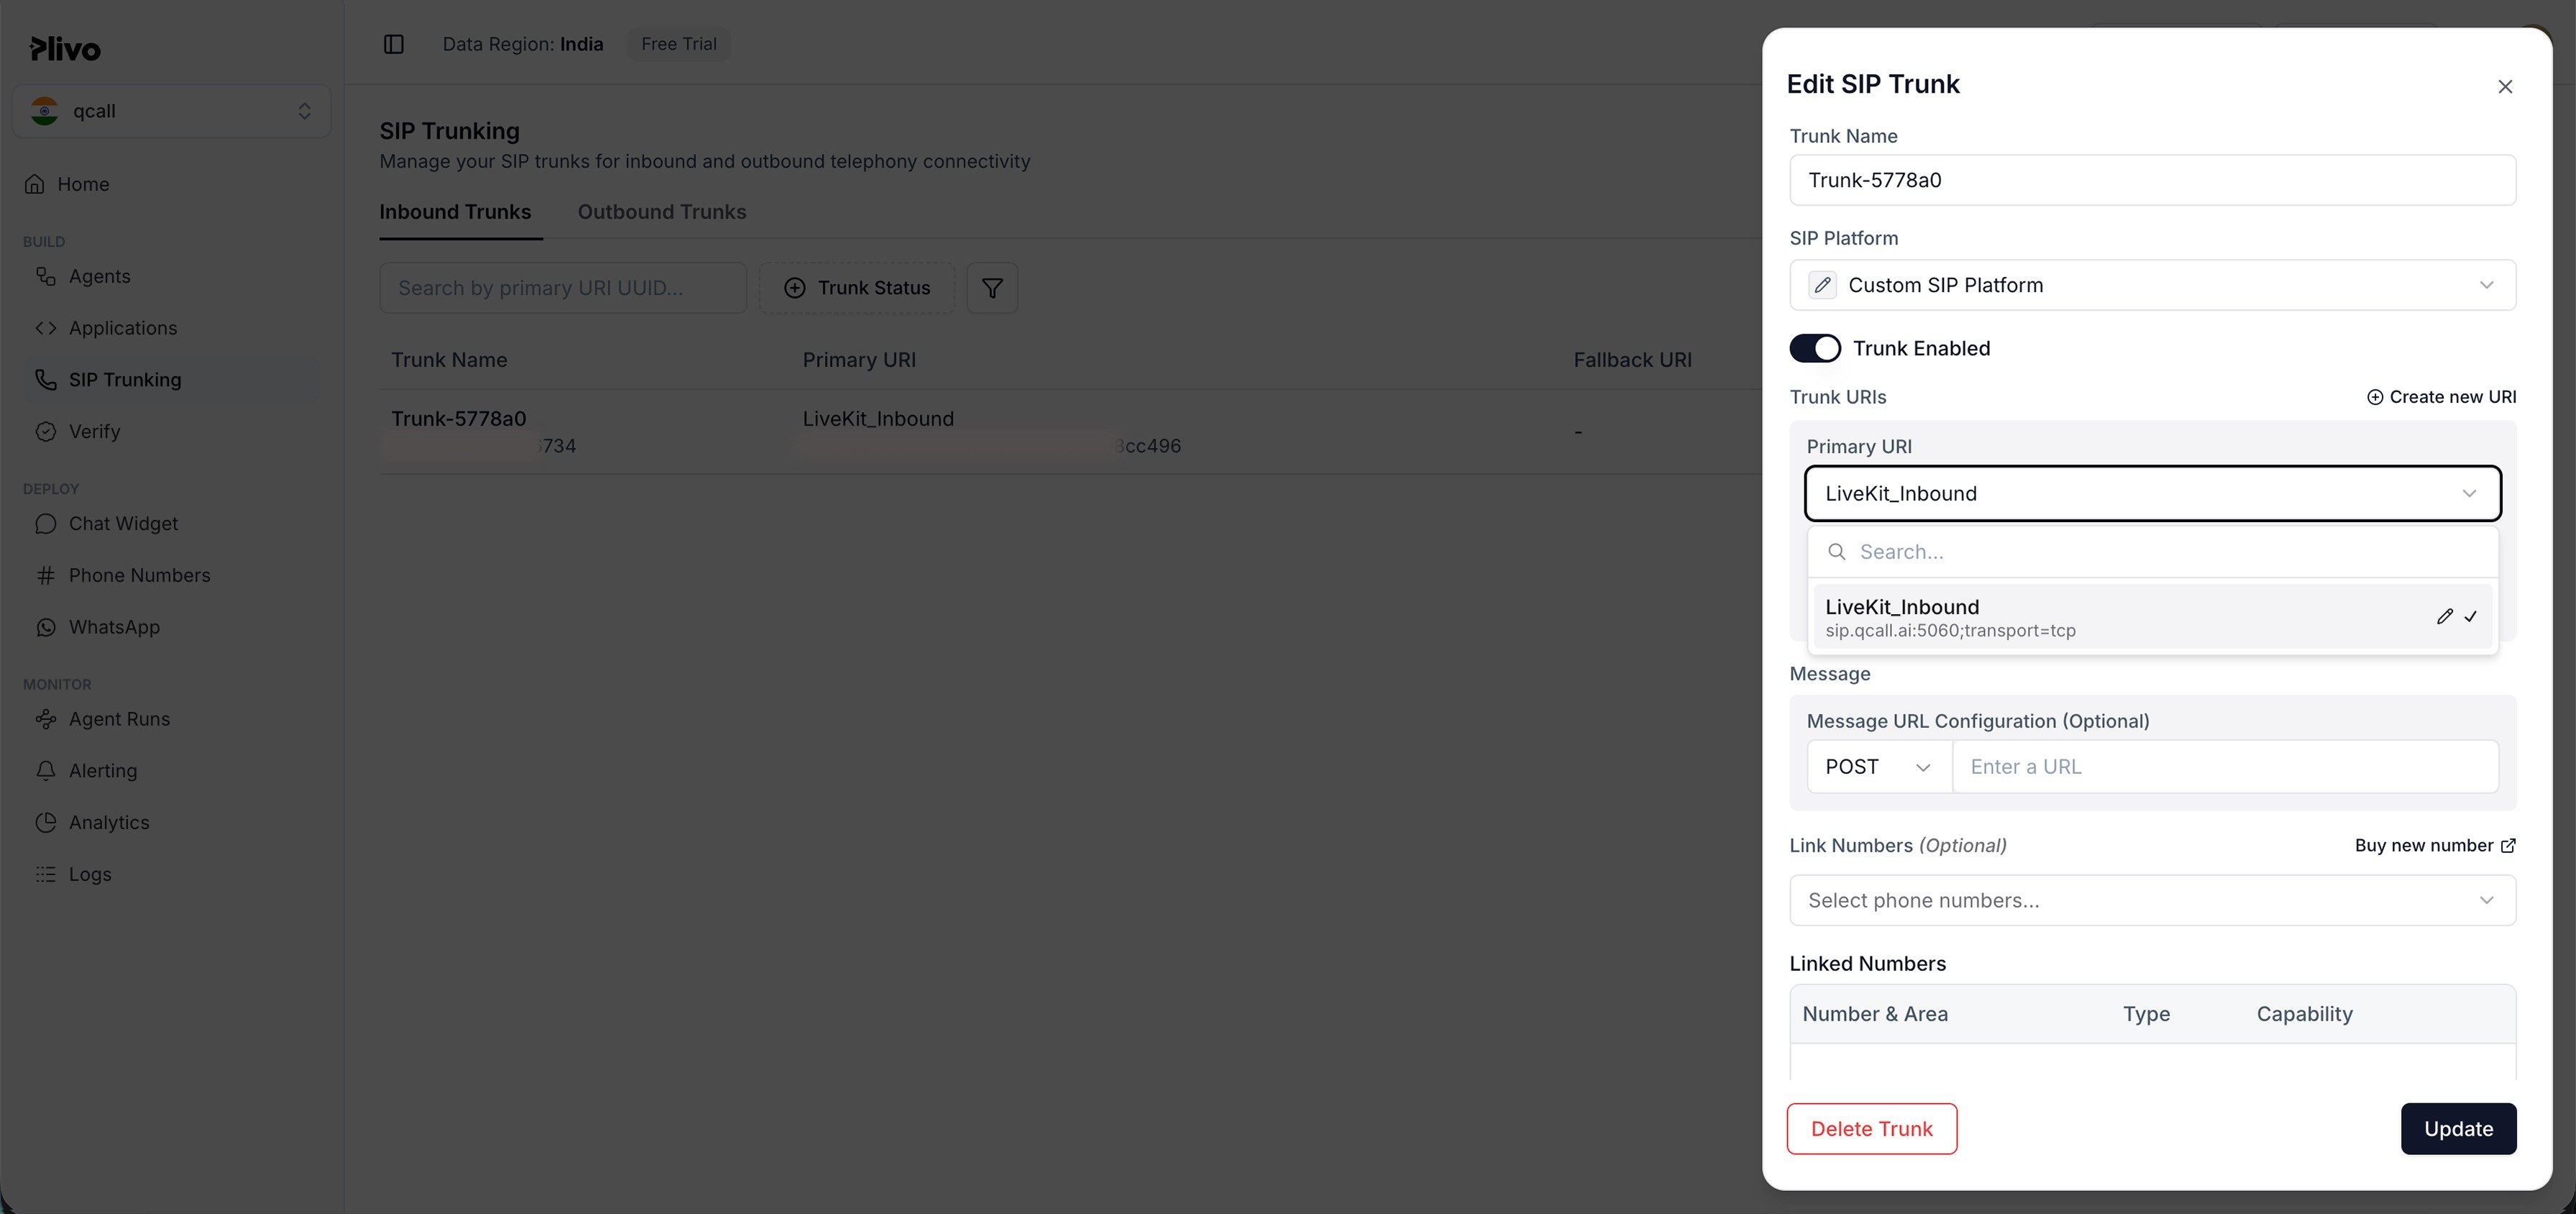
1. Return to the **Plivo console** → **SIP Trunking → Inbound Trunks** → open the inbound trunk from
Step 5.
2. Set the **Primary URI** to your QCall **SIP URI** from Part B:
* Enter it **without** the `sip:` prefix.
* Append **`;transport=tcp`** (recommended) — e.g. `myproj-x1y2.sip.livekit.cloud;transport=tcp`.
* For encrypted signaling/media, use `;transport=tls` instead and enable **Secure Trunking**.
3. Confirm the DID from Step 2 is still **linked** to this inbound trunk.
4. **Save**.
> Alternatively, from **Phone Numbers → Purchased Numbers**, open your number, set
> **Application Type** to **SIP Trunk**, choose the inbound trunk, and **Save changes**.
✅ **At this point you should have all four values** for the cheat-sheet:
termination SIP domain, username, password, and DID number.
***
# Part B — QCall dashboard: add the SIP Dialer
This is what a customer actually clicks in the QCall app.
1. Log in to the **QCall dashboard**.
2. Go to **Settings → Dialers** (the "Dialers" / "Phone Numbers" area).
3. Click **➕ Add Dialer** and choose **SIP** as the dialer type.
4. Fill in the form using your cheat-sheet:
| Field | What to enter |
| ----------------------- | ----------------------------------------------------------------- |
| **Dialer Name** | Any label, e.g. `My Plivo Line` |
| **Phone Number** | Your Plivo DID in E.164, e.g. `+12025550147` |
| **SIP Termination URI** | Your Plivo termination domain, e.g. `21784177241578.zt.plivo.com` |
| **SIP Username** | The Plivo credential username, e.g. `qcallprod` |
| **SIP Password** | The Plivo credential password (paste the one you copied) |
5. Click **Create / Save**.
**What QCall does behind the scenes** (no action needed from you):
* Creates a **outbound trunk** → sends outbound calls to your Plivo termination domain,
authenticated with your username/password, using your DID as caller ID.
* Creates a **inbound trunk** → matched to your DID number.
* Creates a **dispatch rule** → routes incoming calls on that number to your AI agent.
**What QCall gives you back:** on success, the dialer now exists and QCall exposes your
**SIP URI** (shown in the dialer's SIP config / setup instructions, format
`yourproject.sip.livekit.cloud`). **Copy it — you need it for Part C.**
> If you don't see the SIP URI in the UI, it's a fixed value for your QCall workspace — ask QCall
> support and they'll provide your SIP domain.
***
# Part C — Plivo: finish the inbound loop-back
Inbound calls only reach your AI agent once Plivo knows where to forward them.
1. Return to the **Plivo console** → **SIP Trunking → Inbound Trunks** → open the inbound trunk from
Step 5.
2. Set the **Primary URI** to your QCall **SIP URI** from Part B:
* Enter it **without** the `sip:` prefix.
* Append **`;transport=tcp`** (recommended) — e.g. `myproj-x1y2.sip.livekit.cloud;transport=tcp`.
* For encrypted signaling/media, use `;transport=tls` instead and enable **Secure Trunking**.
3. Confirm the DID from Step 2 is still **linked** to this inbound trunk.
4. **Save**.
 Now the loop is closed:
* **Outbound:** QCall → `21784177241578.zt.plivo.com` (your Plivo trunk) → PSTN.
* **Inbound:** Caller → your DID → Plivo → `myproj-x1y2.sip.livekit.cloud` (QCall) → AI agent.
***
## Testing
**Outbound test**
1. In QCall, assign the new SIP dialer to a campaign or a Playground test call.
2. Place a call to your own mobile. It should ring with your Plivo DID as caller ID and the AI
agent should speak when you answer.
**Inbound test**
1. From any phone, call your Plivo DID number.
2. It should connect to your AI agent (assign an inbound assistant to this dialer/number in QCall
first).
***
## Troubleshooting
| Symptom | Likely cause & fix |
| --------------------------------------------------- | ----------------------------------------------------------------------------------------------------------------------------------------- |
| `Failed to create SIP configuration` on save | One of the SIP fields is wrong/empty. Re-check termination domain, username, password. All required. |
| Outbound call fails / 401 / 403 at Plivo | Wrong username/password, or the credential isn't attached to the Outbound Trunk whose `.zt.plivo.com` you entered. |
| Outbound rejected (number/format) | DID must be E.164 with `+` in QCall. Confirm the DID is Voice-capable on Plivo. |
| Inbound call never reaches the agent | Part C not done, or Primary URI wrong. It must be the `*.sip.livekit.cloud` host **without** `sip:` prefix and **with** `;transport=tcp`. |
| "This phone number is already being used" | The DID is already registered to another QCall dialer/workspace. Delete the old dialer or use a new DID. |
| Audio one-way or choppy | Codec/transport mismatch. Ensure PCMU (G.711 µ-law) is allowed; use `;transport=tcp` on the Primary URI. |
| Plivo rejects the password when creating credential | Password must be 5–20 chars with at least one special char from `~!@#$%^&*()_+`. |
| Password stopped working | Plivo passwords are write-once. If rotated/lost, create a new credential and update the QCall dialer. |
***
## Sources
* [Plivo SIP Trunking (Zentrunk) — Quickstart](https://plivo.com/docs/sip-trunking)
* [Plivo — SIP Trunking product](https://www.plivo.com/sip-trunking/)
* [Plivo — Trunks API](https://plivo.com/docs/sip-trunking/api/trunks)
* [— Create and Configure a Plivo SIP Trunk](https://docs.livekit.io/telephony/start/providers/plivo/)
* [QCall — Vobiz SIP Integration](https://docs.qcall.ai/general/dialer/vobizSipIntegration) (sister guide)
Now the loop is closed:
* **Outbound:** QCall → `21784177241578.zt.plivo.com` (your Plivo trunk) → PSTN.
* **Inbound:** Caller → your DID → Plivo → `myproj-x1y2.sip.livekit.cloud` (QCall) → AI agent.
***
## Testing
**Outbound test**
1. In QCall, assign the new SIP dialer to a campaign or a Playground test call.
2. Place a call to your own mobile. It should ring with your Plivo DID as caller ID and the AI
agent should speak when you answer.
**Inbound test**
1. From any phone, call your Plivo DID number.
2. It should connect to your AI agent (assign an inbound assistant to this dialer/number in QCall
first).
***
## Troubleshooting
| Symptom | Likely cause & fix |
| --------------------------------------------------- | ----------------------------------------------------------------------------------------------------------------------------------------- |
| `Failed to create SIP configuration` on save | One of the SIP fields is wrong/empty. Re-check termination domain, username, password. All required. |
| Outbound call fails / 401 / 403 at Plivo | Wrong username/password, or the credential isn't attached to the Outbound Trunk whose `.zt.plivo.com` you entered. |
| Outbound rejected (number/format) | DID must be E.164 with `+` in QCall. Confirm the DID is Voice-capable on Plivo. |
| Inbound call never reaches the agent | Part C not done, or Primary URI wrong. It must be the `*.sip.livekit.cloud` host **without** `sip:` prefix and **with** `;transport=tcp`. |
| "This phone number is already being used" | The DID is already registered to another QCall dialer/workspace. Delete the old dialer or use a new DID. |
| Audio one-way or choppy | Codec/transport mismatch. Ensure PCMU (G.711 µ-law) is allowed; use `;transport=tcp` on the Primary URI. |
| Plivo rejects the password when creating credential | Password must be 5–20 chars with at least one special char from `~!@#$%^&*()_+`. |
| Password stopped working | Plivo passwords are write-once. If rotated/lost, create a new credential and update the QCall dialer. |
***
## Sources
* [Plivo SIP Trunking (Zentrunk) — Quickstart](https://plivo.com/docs/sip-trunking)
* [Plivo — SIP Trunking product](https://www.plivo.com/sip-trunking/)
* [Plivo — Trunks API](https://plivo.com/docs/sip-trunking/api/trunks)
* [— Create and Configure a Plivo SIP Trunk](https://docs.livekit.io/telephony/start/providers/plivo/)
* [QCall — Vobiz SIP Integration](https://docs.qcall.ai/general/dialer/vobizSipIntegration) (sister guide)